How to Work From Reference With a Limited Palette
A photographic reference contains far more color variation than most painters can use: more hue shifts, more saturation noise, more incidental detail than any scene actually requires. For a painter working with a small set of paints, all of that extra information creates a specific kind of trouble: too many mixtures, too much hesitation, and a painting that gradually loses its organization trying to account for every note in the source.
Limited palettes address this directly. They reduce the number of decisions, force color relationships to simplify, and make it easier to identify what the painting actually requires.
What Is a Limited Palette?
A limited palette is a deliberately small set of paints: four colors, five colors, sometimes just one warm and one cool of each primary plus white. The point is not self-denial. The point is control. When every mixture comes from the same small family of pigments, the painting tends to hold together. You spend less time hunting for the right tube and more time understanding what the subject actually needs.
- It reduces decisions. Fewer tubes means fewer options at the moment it matters most.
- It reveals what the painting actually needs. If a passage only works with one very specific tube, that is usually a sign the problem is not the paint.
- It builds pigment knowledge. Working repeatedly with the same paints teaches you their strengths, limits, and reliable mixture paths.
The goal is not restriction for its own sake. It is choosing the narrowest palette that still supports the subject.
Common Limited Palettes
The right palette depends on the subject and on the painter. A portrait, a high-key still life, and a saturated landscape do not place the same demands on your pigments. There is no single canonical limited palette, but a few keep appearing because they are genuinely useful.
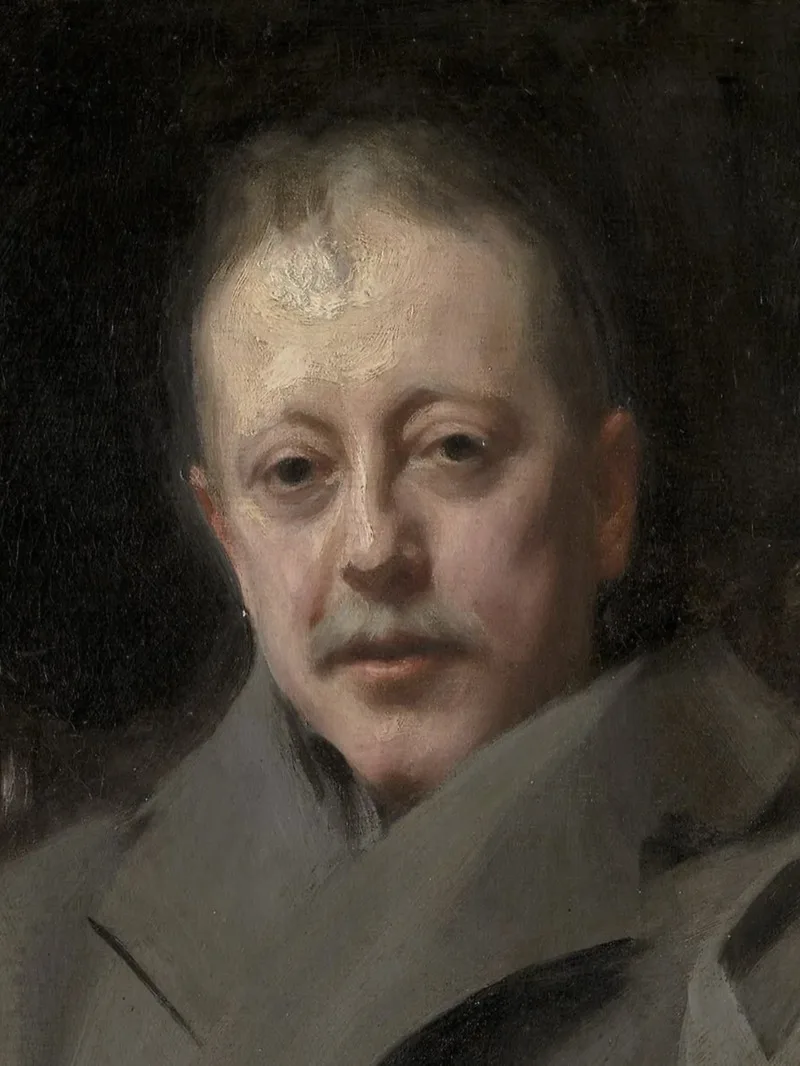
The Zorn palette is the most famous example: white, yellow ochre, vermilion or cadmium red, and black. There is no blue pigment. Black mixed with white stands in for cool notes, and mixed with yellow ochre produces the muted greens the palette needs. It is far more flexible than it first appears, especially for portraits and muted natural subjects.
A primary palette uses a red, a yellow, a blue, plus white, and often black. This is a stricter way to work and quickly reveals what cannot be mixed cleanly from a minimal set.
A split-primary palette gives you a warm and cool version of each primary. That is still limited relative to a full box of paint, but broad enough to cover many subjects without constant compromise.
Earth-color palettes built around ochres, siennas, umbers, a blue, a red, and white remain common because they align well with the kinds of muted mixtures that many realist painters actually need.
Working From a Full-Color Reference
Your reference is full-spectrum. Your paint box is not.
A camera captures saturated blue-greens, neon reflections, cool violet shadows, and a dozen subtle shifts inside a single cheek. Your palette may not reach those notes cleanly, or at all. And even when a color is technically mixable, it is not always obvious how it should be shifted so it still belongs to the painting. This is why limited-palette work from a photo can feel harder than painting from life.
The practical answer is to see the reference under the same constraint before you begin. Instead of staring at the full-color source and trying to mentally predict what your Zorn palette or split primary will do to it, you can convert the image into the colors your palette can actually produce. That gives you a realistic target rather than an impossible one, and it prevents the most common mistake: chasing colors the palette was never capable of giving you.
How to Use This in Lucida
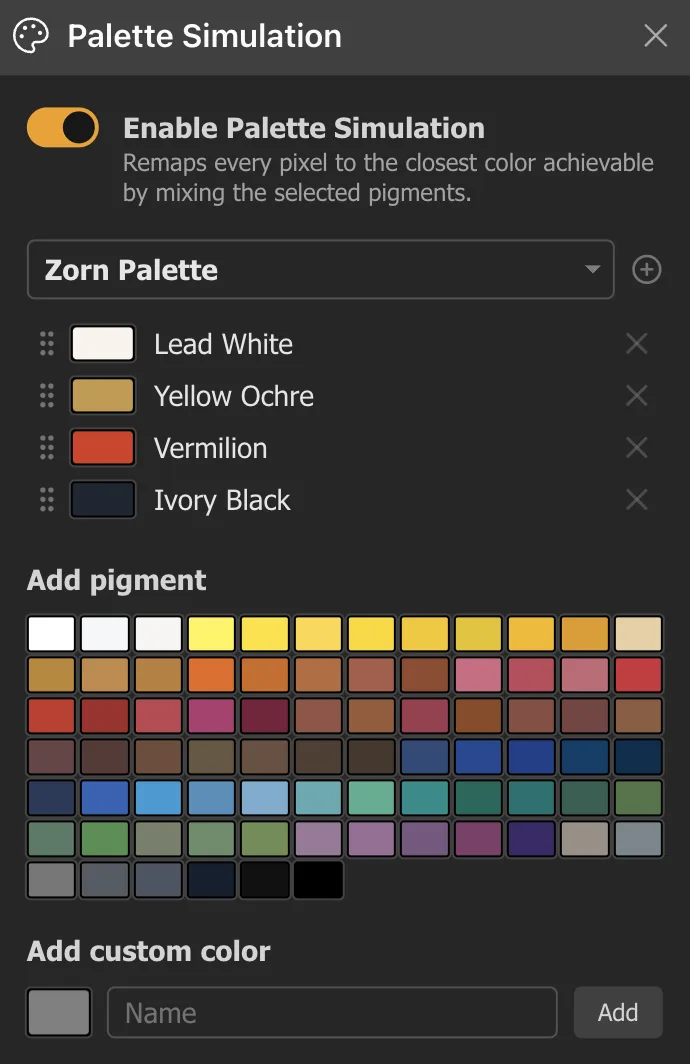
Lucida's Palette Simulation does exactly this. It remaps the image to the closest colors achievable by mixing a chosen set of pigments, so you can preview the subject as if it were painted with that palette.
That is especially useful when you are deciding whether a palette is appropriate before you begin, or when you are halfway through a painting and need to understand why certain mixtures keep fighting you.
Lucida includes built-in palettes like a general-purpose default palette, a strict primary palette, and a Zorn palette. You can also build your own palette, edit the pigment list, rename colors, and save custom sets.
The practical question it answers is simple: if I only use these paints, what does this reference actually become?
Palette Simulation vs. Posterize
These tools are related but solve different problems.
Palette Simulation remaps the image continuously into the gamut of your chosen paints. Use it when you want to know what your palette can and cannot reach.
Posterize by Value simplifies the tonal structure into broad light and shadow masses. Use it when the image is too complex to read the value design clearly.
Posterize by Color reduces the image to a small number of dominant color families. Use it when the reference is chromatically noisy and you need to see the big color shapes.
They work well together. A common sequence: start with Posterize by Value to clarify the value design, then add Palette Simulation to see how the subject fits your chosen paints. If the reference is noisy, run Posterize by Color first to reduce it to broad families before applying the palette constraint.
Lucida also lets you edit the swatches that Posterize by Color generates. You can replace colors, nudge them toward paints you actually intend to use, and design the reference before you begin. That commits you to a deliberate color statement instead of leaving you to react to every accidental note in the photo.
Using the Color Picker to Compare Reference and Artwork
Once you start painting, the question shifts: not what the reference looks like, but how your mixture compares to it.
Lucida's color picker is built for that kind of comparison. You can sample a point on the reference and the corresponding point on your artwork, then compare the two in painterly terms: lighter or darker, warmer or cooler, more or less saturated.
That is especially helpful with limited palettes because the error is often not dramatic in hue name, but relational. A mixture may be slightly too cool, slightly too dull, or just a little too dark to sit correctly.
If Image Sync is enabled, the picker can also sample equivalent positions across both panes with a single tap, which makes comparison faster and less error-prone.
A Practical Workflow for Limited-Palette Painting
- Choose your palette before you start mixing. Decide whether the subject calls for Zorn, a primary palette, a split-primary setup, or some other limited set you already know well.
- Run Palette Simulation on the reference. See what the subject looks like when expressed in the paints you actually have available.
- Check the value structure separately. If the subject is complex, use Posterize by Value so the big light and shadow design is clear before you worry about color subtlety.
- Use Posterize by Color when the reference is noisy. Reduce the image to broader color families, then compare those families against your palette choices.
- Edit swatches if needed. If Posterize by Color gives you families that are close but not quite where you want them, adjust the swatches and use that edited version as a design aid.
- Compare paint to reference with the color picker. Sample the same spot on the reference and on your artwork to see whether the mixture is too warm, too cool, too light, too dark, or too dull.
Common Mistakes
-
Choosing a palette for ideology rather than usefulness.
A limited palette is only helpful if it supports the subject. Restriction by itself is not a virtue. -
Expecting the original photo to remain unchanged under the palette.
If the palette cannot reach a color, that color will have to shift. Better to see that early than fight it for two hours at the easel. -
Using Palette Simulation as a substitute for judgment.
It is a guide, not an authority. The painter still decides which shifts are desirable. -
Ignoring value while focusing on gamut.
A beautifully limited palette will not save a badly organized value structure. -
Comparing colors loosely instead of specifically.
With a limited palette, mistakes tend to be subtle: a mixture that reads slightly too warm, too cool, or too dull rather than plainly the wrong color. Eyeballing is not enough. Sample exact points and compare them.
Getting Started
- Open Lucida in your browser.
- Load your reference into one pane.
- Turn on Palette Simulation and choose a limited palette.
- Check the value structure with Posterize by Value if needed.
- Use Posterize by Color if the reference is too noisy to read cleanly.
- Compare your painted passages against the reference with the color picker as you work.
The goal is not to let the tool paint for you. It is to start with a clear picture of what your palette can actually do before your brush touches the canvas.
Lucida is a browser-based observation aid for classical and realist artists. It can be used for free, with an optional Pro version for higher limits and additional features. Palette Simulation is available in Pro. No account required. Learn more.